viernes, 26 de diciembre de 2008

Aimbot Auto Fire

Too do autofire you can just use mouse_event to simulate pressing the fire key which is more than likely left mouse so you could do something like this:

Code:
if ( bAutoFire )
{
mouse_event( MOUSEEVENTF_LEFTDOWN, 0, 0, 0, 0 );
mouse_event( MOUSEEVENTF_LEFTUP, 0, 0, 0, 0 );
}

[LEARN] IAT Hooking

[LEARN] IAT Hooking

Just before we start, let me mention that this tutorial teaches you how to do IAT hooking on your own module. Each module in a portable executable has its own IAT. In fact, it is not that hard to hook the IAT of another module if you have a good knowledge of the PE format. I may post a tutorial on how to do that sometime..

Straight into it :

Code:
.486
.model flat,stdcall
option casemap:none
option epilogue:none
option prologue:none
include \masm32\include\windows.inc
include \masm32\include\user32.inc
include \masm32\include\kernel32.inc
includelib \masm32\lib\user32.lib
includelib \masm32\lib\kernel32.lib

myfunc proto :DWORD, :DWORD, :DWORD, :DWORD

.DATA

Caption db "Success !",0
Text db "Called successfully via trampoline",0

.DATA?

fxn_addr dword ?

.CODE

start:

xor ebx,ebx
mov eax,[MessageBox]
add eax,2
mov eax,[eax]
mov eax,[eax]
add eax,5
mov fxn_addr, eax

invoke myfunc, ebx, addr Text, addr Caption, ebx
invoke ExitProcess, ebx

myfunc proc w:DWORD,x:DWORD,y:DWORD,z:DWORD

push ebp
mov ebp,esp
jmp fxn_addr

myfunc endp

end start
Here I show you a way to trampoline over first 5 bytes of MessageBox without ever calling GetModuleHandle/LoadLibrary and GetProcAddress
Instead I use my understanding of the MASM32 linker to read the current address of the IAT via the thunk table Read on !

Code:
.486
.model flat,stdcall
option casemap:none
option epilogue:none
option prologue:none
include \masm32\include\windows.inc
include \masm32\include\user32.inc
include \masm32\include\kernel32.inc
includelib \masm32\lib\user32.lib
includelib \masm32\lib\kernel32.lib
Making declarations, etc. etc. Important things to note are these two lines:

Code:
option epilogue:none
option prologue:none
Usually when you are making a call to your own defined function, it will add some code at the start that sets up stack frame and some code that pops EBP back off. That is, your function will automatically set up its own stack frame:

Code:
push ebp
mov ebp, esp
Saving stack base then changing new stack base as old top of stack.
So we want to turn this function off and you will see why later.

Code:
myfunc proto :DWORD, :DWORD, :DWORD, :DWORD

.DATA

Caption db "Success !",0
Text db "Called successfully via trampoline",0

.DATA?

fxn_addr dword ?
Declaring my own function prototype that takes 4 dwords as arguments. Defining 2 null terminated strings for later. Defining an uninitialised dword that will hold the function address that we want to trampoline.

Code:
.CODE

start:

xor ebx,ebx
mov eax,[MessageBox]
add eax,2
mov eax,[eax]
mov eax,[eax]
add eax,5
mov fxn_addr, eax
First let me tell you a bit about the MASM linker. It tells the PE loader where addresses are via its own thunk table which is usually located at the end of the executable. It is a pointer to the import address table (which updates off the corresponding dynamic link library's export address table I believe).

So first off, I set ebx to 0 as above. This means later when I am going to use "push 0" instructions, I can "push ebx" instead which results in a smaller, faster executing program. ebx is chosen because it is a register that stdcall convention does not fiddle around with, unlike eax, ecx and edx.

Let me just show you a screenshot of the thunk table generated by MASM's linker:


You can see several things here.

- The "CALL 0040102D" is the call to my function. It directly calls the address of my function.
- There is a little table at the end with 3 entries

The table is the JMP thunk table. If you look at what code is the call to ExitProcess:


It does not call the virtual address of ExitProcess. This is because the address changes and so you can not just hardcode an address, unlike for my own function. What it calls instead is the entry of ExitProcess in the thunk table which is:

JMP DWORD PTR DS:[<&kernel32.ExitProcess>]

If you try to see what instruction that actually is, it is:

JMP DWORD PTR DS:[402000]


0x402000 is the entry in the import address table for the ExitProcess function. So if you look in the hex dump..


Bearing in mind the little endianness that the 80x86 uses, this means the current address of ExitProcess on my system is 0x76793B54. Sure enough, if I go there:


You can already recognise that procedure as ExitProcess because of the native API it calls : RtlExitUserProcess.

So now we know how to manually find the address of a function, look at how I have done it in MASM:

Code:
    mov eax,[MessageBox]
add eax,2
mov eax,[eax]
mov eax,[eax]
add eax,5
mov fxn_addr, eax
The first instruction will move the virtual address of the entry in the thunk table of MessageBox into eax. Then we add 2 to that address. Maybe you are thinking "wtf is this kid smoking ?". Look at this:


The bytes for "JMP DWORD PTR DS:[402008]" is "FF25 08204000". So the first 2 bytes "FF 25" must be for the opcode saying JMP DWORD PTR DS:[]. Then the pointer itself are the next 4 bytes (note the little endianness), 08204000 >> 402008

So "mov eax, [MessageBox]" would lead us to the virtual address that the above instruction is on. So to get to the actual pointer to the IAT entry for this API, we need to add 2 bytes. Next we have:

Code:
    mov eax,[eax]
mov eax,[eax]
We move the dword that is pointed to by eax into eax. So before this instruction executes, eax is the address of the thunk entry for that address + 2 which is the pointer to the IAT entry. So the first "mov eax, [eax]" moves the address of the IAT entry into eax. Then we do it again and this time the dword held at the IAT entry is moved into eax. You already saw from before that IAT holds a pointer to the function address.
Now we set up our address ready for trampolining:

Code:
    add eax,5
mov fxn_addr, eax
We add 5 to eax and then move that into our buffer named fxn_addr. All will be explained later if you have not come across this 5 byte trampoline method before !

Code:
        invoke myfunc, ebx, addr Text, addr Caption, ebx
invoke ExitProcess, ebx

myfunc proc w:DWORD,x:DWORD,y:DWORD,z:DWORD

push ebp
mov ebp,esp
jmp fxn_addr

myfunc endp
end start
So directly after this, I invoke my prototype function. The 4 dword parameters it is taking is ebx, address of text, address of caption and ebx again. These are the arguments for a normal call to MessageBox:


So the hWnd and type is null, which is fine if you look at the exact description of those arguments. Then address of text and caption as defined earlier, fine also. Now let's look at what my function is comprised of:

Code:
myfunc proc w:DWORD,x:DWORD,y:DWORD,z:DWORD
push ebp
mov ebp,esp
jmp fxn_addr

myfunc endp
All it does is set up stack frame then jmp to the fxn_addr which is address of MessageBoxA + 5. So when I call my procedure, what happens is:
- Return address is pushed onto stack (virtual address of instruction directly after the call)

- Execution goes to the address that is called
- My procedure sets up stack frame (which is what the first 5 bytes of MessageBoxA does)
- We jmp to MessageBoxA + 5

What this has achieved is that it means we can now execute any function without ever touching its first 5 bytes. This is where GameGuard places its usermode hooks, as a far jump at the first 5 bytes of the function. So we can use this method to trampoline over GG's hook.

There are a few tricks that you will have to learn before you are able to do this to bypass a usermode hook but I'll let you figure that out yourself, it'd be no fun if I told you everything !

Later to come if I get bored enough.. How to do IAT hooking and intercept arguments of a function call and replace it with your own

(Now is later..)

MOAR CODE !!!

This code shows how to dynamically fetch the first 5 bytes (before I hardcoded bytes to set up stack frame). It also shows how to hook your own program's IAT and notice I have intercepted and modified the arguments of a call to MessageBox. If you need anything explained, please shout

Code:
.486
.model flat, stdcall
option casemap:none
option epilogue:none
option prologue:none
include \masm32\include\windows.inc
include \masm32\include\user32.inc
include \masm32\include\kernel32.inc
includelib \masm32\lib\user32.lib
includelib \masm32\lib\kernel32.lib

WriteMem proto
My_Proc proto

.DATA

Caption db "Title",0
Text db "Text",0
API_Fxn dd MessageBox
Mod_Caption db "Modified Title",0
Mod_Text db "Modified Text",0

.DATA?

IAT_Entry_Addr dword ?
Fxn_Addr dword ?
Proc_Addr dword ?
Ret_Addr dword ?

Arg1 dword ?
Arg2 dword ?
Arg3 dword ?
Arg4 dword ?

StackFrameCheck dword ?

.CODE

start:

xor ebx, ebx
mov eax, [API_Fxn]
add eax, 2
mov eax, [eax]
mov IAT_Entry_Addr, eax
mov eax, [eax]
mov Fxn_Addr, eax
mov eax, offset My_Proc
mov Proc_Addr, eax

invoke WriteMem

push ebx
push offset Caption
push offset Text
push ebx
call API_Fxn

invoke ExitProcess, ebx

WriteMem proc

LOCAL OldProt:DWORD
LOCAL OldProcProt:DWORD

invoke VirtualProtect, IAT_Entry_Addr, 4, PAGE_EXECUTE_READWRITE, addr OldProt

mov ecx, Proc_Addr
mov edx, IAT_Entry_Addr
mov [edx], ecx

invoke VirtualProtect, IAT_Entry_Addr, 4, OldProt, addr OldProt
invoke VirtualProtect, Proc_Addr, 5, PAGE_EXECUTE_READWRITE, addr OldProcProt

mov eax, Fxn_Addr
mov eax, [eax]
mov ecx, [Proc_Addr]
mov [ecx], eax
mov eax, Fxn_Addr
add eax, 4
mov al, byte ptr ds:[eax]
mov ecx, [Proc_Addr]
add ecx, 4
mov byte ptr ds:[ecx], al

invoke VirtualProtect, Proc_Addr, 5, OldProcProt, addr OldProcProt
ret

WriteMem endp

My_Proc proc
nop
nop
nop
nop
nop
pop StackFrameCheck
pop Ret_Addr
pop Arg4
pop Arg3
pop Arg2
pop Arg1
push ebx
push offset Mod_Caption
push offset Mod_Text
push ebx
push Ret_Addr
push StackFrameCheck
mov eax, [Fxn_Addr]
add eax, 5
jmp eax
My_Proc endp

end start
Dynamically reads first 5 bytes of a given function and writes it to our own function prototype which then executes those 5 bytes, intercepts the arguments, modifies them and then trampolines over the real first 5 bytes (possible place where hook would go) to execute the rest of the real function

Features I intend to add soon:

- Allow user to choose what function to intercept and trampoline
- Allow user to choose what arguments to replace
- Dynamically push and pop only as many arguments as there are for that function. eg. had that function been say ExitProcess instead, it only has 1 argument and wastes clock cycles/space to hardcode it to push and pop 5 items off the stack including EBP. Not actually sure how to do this yet without setting up a big-ass array of all WinAPIs with the number of arguments they take. Even then some APIs have optional functions AARRGGHHHH !!!

- Check whether the first 5 bytes includes pushing of EBP. If not, then it doesn't have to be popped
- Convert to a DLL to allow any usermode hooked API in a target process to be trampolined over/bypassed and all arguments for that intercepted
- Not very likely but I might create a GUI for the DLL
Btw, yes I know the code for copying of the first 5 bytes is very ugly at the moment but I'm a newby, go easy
__________________

miércoles, 24 de diciembre de 2008

Microsoft Visual Basic 6 Video Tutorial

Microsoft Visual Basic 6 is a versatile language, usable for business applications, database interface, gaming applications, and even for presentations.

Professor Arthur Lee authors this tutorial. He begins by introducing code and the controls needed in Visual Basic. Learn all about variables, debugging, and creating menus, as well.

To get started now, click below on the topic of your choice.


01 Introduction and Getting Started

0101 Introduction & Visual Basic Overview

0102 The VB 6 Environment (window orientation)

0103 The VB 6 Environment (placing controls on form)

0104 The First Project ("Hello World")

0105 Writing Code

0106 Modifications to "Hello World"

0107 Saving and Running the Project

0108 Common errors, Debugging

0109 Code Window Views

0110 Naming Rules and conventions for controls

0111 Form Properties (startup position, window state, Visible)

martes, 23 de diciembre de 2008

[PDF] The Black Art of Xbox Mods

The Black Art of Xbox Mods


The Black Art of Xbox Mods
Sams Publishing | ISBN: 0672326833 | 2004-12-14 | PDF | 336 pages | 5 Mb

Is installing a new operating system or tuning the BIOS on your PC second nature to you? Did you know you could do similar things to your Xbox system? The Black Art of the Xbox Mods can show you how to install a modchip to change your Xbox experience. Learn to use Evolution X, the most popular replacement user interface for Xbox, as well as how to install new software, run homebrew games and back up your Xbox games. The Black Art of the Xbox Mods can show you how to make your Xbox work "outside the box."


Download:
www.ziddu.com/download/2947096/0sods.rar.html

[PDF] Hacking the Xbox 360 for Dummies

Hacking the Xbox 360 for Dummies


Complete tutorial on firmware flashing for all 360 drive types (including the new BenQ and Hitachi 0079) as well as backing up and burning games.


Download:
www.ziddu.com/download/2946821/Hacking_Xbox.rar.html

[PDF] Game Console Hacking

Game Console Hacking:
Xbox, Playstation, Nintendo, Atari, & Gamepark 32
Book Review


Table of Contents

The ten (10) chapters are organized in four parts, and include the following titles.

Part 1: Introduction to Hardware Hacking

Ch 1: Tools of the Warranty Voiding Trade
Ch 2: Case Modifications: Building and Atari 2600PC

Part 2: Modern Game Consoles

Ch 3: The Xbox
Ch 4: PlayStation 2

Part 3: Handheld Game Platforms

Ch 5: Nintendo Game Boy Advance
Ch 6: Gamepark 32 (GP32)

Part 4: Retro and Classic Systems

Ch 7: Nintendo NES
Ch 8: Atari 2600
Ch 9: Atari 5200
Ch 10: Atari 7800

Appendix A - Electrical Engineering Basics

Appendix B - Coding 101, and Appendix C - Operating Systems Overview, are available via the companion website at www.syngress.com/solutions


Download:
www.ziddu.com/downloadlink/2943545/Game_Console_Hacking.rar

[PDF] Aprenda Visual Basic 6 desde Cero

Aprenda Visual Basic 6 como si estuviera en primero + Código de Ejemplos


[PDF+ISO] C++ For Dummies + Source Code

C++ For Dummies + Source Code


[PDF] Visual C++6 for dummies

Visual C++ 6 for Dummies


Visual C++ 6 for Dummies


[PDF] C for Dummies, 2nd Edition

C for Dummies, 2nd Edition


Para aquellas personas que quieren iniciarse en la programacion en C, un buen libro para iniciarse.


viernes, 7 de noviembre de 2008

Videos de YouTube como estado en el MSN Messenger

Windows Live Messenger trae una opcion llamada Mostrar lo que estoy escuchando para que tus contactos puedan ver la musica que estas escuchas, pues con Now Watching el Messenger mostrará como mensaje personal el vídeo que estés visualizando de YouTube, Google Videos y myspacetv.com


Abres tu Windows Live Messenger, luego instalas Now Watching, activas la opción Mostrar lo que estoy escuchando y te pones a ver vídeos, asi de facil.


Descargar : Now Watching

martes, 28 de octubre de 2008

Finding offsets

Finding offsets

todas las imagenes esta en mi geocities ok


This is an OLD OLD tutorial that I meant to release but I forgot to. It is for old gunbound and Im sorry I forgot to give it out but here goes nothing. It may, or may not at least help people understand this a bit better.

This is a private tut but seeing as gunbound was patched and upgraded so many times after this tut was given to me, its most likely leaked or everyone knows how to do it by now. Either way...

Map Offset

1. Make A
Room and Password Protect It
2. Change the Map and based on what the Map is, search the following values

* Random: 255
* Miramo Town: 1
* Nirvana: 2
* Metropolis: 3
* Sea of Hero: 4
* Adiumroot: 5
* Dragon: 6
* Cozy Tower: 7
* Dummy Slope: 8
* Stardust: 9
* Meta Mine: 10

3. Change the maps and search in the memory editor corrisponding what is above (Byte 1).
4. When you get the offset, record it down.

Status Offset
3. When the person's time comes to shoot, search the value corrisponding above.
4. Continusly do this until you come to one or two offsets and then record it down.

If you have SHAB:

1. Run SHAB
2. Make a room
3. Start game
4. Press ALT + F12
5. See the number next to the username on the bottom of the screen
6. Search that value
7. Press ALT + F12
8. See the number next to the username on the bottom of the screen
9. Search that value
10. Repeat these steps until you get the address

Bot Offset

1. Make a room
2. Lock it with a password
3. Change the Mobile and based on what the Mobile is, search the following values:

* Armor: 0
* Mage: 1
* Nak: 2
* Trico: 3
* Big Foot: 4
* Boomer: 5
* Raon: 6
* Lightning: 7
* J.D.: 8
* A.Sate: 9
* Ice: 10
* Turtle: 11
* Grub: 12
* Aduka: 13
* Random: 255

3. Change the mobiles and search in the memory editor corrisponding what is above (Byte 1).
4. When you get the offset, record it down.

Camera X Offset

1. Enter A Battle
2. Search Unknown
3. Move Your Mouse Some to the Left
4. Search Has Decreased
5. Move Your Mouse Some to the Right
6. Search Has Increased
7. Keep on alternating and changing until you get the offset and then record it down.

Camera Y Offset

1. Enter A Battle
2. Search Unknown
3. Move Your Mouse Some Up
4. Search Has Decreased
5. Move Your Mouse Some Down
6. Search Has Increased
7. Keep on alternating and changing until you get the offset and then record it down.

Index Offset

Haven't Learned It

Location Offset

1. Enter A Battle
2. Search Unknown
3. When its your turn, move left
4. Search Has Decreased
5. When its your turn, move right
6. Search Has Increased
7. Keep on alternating until you get the offset and then record it

Name Offset (This Requires Searching in Hex. T-Search Maybe Required)

Make a room
Search for your name (string)
Ask a friend to make a room
Enter it
Search his name (string)
You should have the address already and then record it.

Wind Offset

1. Open T-Search
2. Make a Room (Need to be Key to do this)
3. Start the game
4. Search for Unknown Value
5. Search for the wind value byte 1
6. When wind changes, search wind again byte 1
7. Keep on doing this and searching every time the wind changed.
8. Eventually you should find the Wind Offset and then when you do, record it.

Power Offset

1. Enter A Battle
2. Search Unknown
3. Move the slider left
4. Search Has Decreased
5. Move the slider right
6. Search Has Increased
7. Keep on alternating until you get the offset and then record it.

Index Base

Haven't Learned Yet

Wind Base

Haven't Learned Yet

Game Base

1. Enter A Battle
2. Search Unknown
3. Search 8158040 (either 2, 3, or 4 bytes)
4. Look in the list for a value between 5CXXXX to 60XXXX (list is not big) and then record it.

Also Try Using This Tutorial To Find The Game Base Offset

1. Enter A Battle
2. Search Unknown
3. Search 8158040 (either 2, 3, or 4 bytes)
4. Shoot and end your turn (MUST SHOOT)
5. Search 8158040 (either 2, 3, or 4 bytes)
6. Shoot and end your turn (MUST SHOOT)
7. Keep on doing this until you get 1 to 2 addresses and then record both of them.


Now your like, WTF! What am I going to do with these addresses!
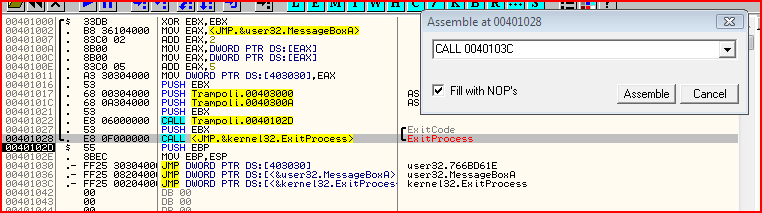
Well, Here is the interesting part. Unpack the GunBound.gme using Stripper and then open that file in a HEX Editor. After you do that, view this image.


1. Make a room
2. Keep Track Of Who in the Top Left Most and Top Right Most and etc. For additional help, when the game begins, just make a screenshot and paste it in Paint.

* The Top Most, Left Most is 1
* The Top Most, Left is 2
* The Bottom Most, Left Most is 3
* The Bottom Most, Left is 4
* The Top Most, Right Most is 5
* The Top Most, Right is 6
* The Bottom Most, Right Most is 7
* The Bottom Most, Right is 8

Look at this screenshot for more help.

API Copying/Trampolines by Irwin

API copying is an old yet effective technique which renders user-mode hooks useless, this is because most user-mode hooks rely on physically hooking the API through either a detour (inline on API or IAT) so by copying the API you render the hook useless. So here's quite an easy example of API copying & also a small trampoline:

Code:
.386
.model flat, stdcall

option casemap : none
include \masm32\include\windows.inc
include \masm32\include\kernel32.inc
includelib \masm32\lib\kernel32.lib

.data

strUser32 db "user32.dll", 0
strSendInput db "SendInput", 0
strMouse_Event db "mouse_event", 0
strKeybd_Event db "keybd_event", 0

lpflOldProtect dd 0

.code

xSendInput proc ;; SendInput copy, this will have enough room for the copy. (you could allocate & copy more if it changes)
dd 090909090h
dd 090909090h
dd 090909090h
db 090h, 090h, 090h
;db 15d dup(?) ; I could have done this but it doesn't look nice when debugging :<
db 090h ; Gap for debugger cleanliness :P
xSendInput endp

CalcJump proc Source:DWORD, Destination:DWORD ;; Jump calculation function. dest - source - 5 = offset
mov ecx, dword ptr ds:[Destination]
sub ecx, dword ptr ds:[Source]
sub ecx, 5
pop ebp
retn 8
db 090h ; Gap for debugger cleanliness :P
CalcJump endp

WinMain proc
invoke LoadLibrary, addr strUser32 ; Load user32.dll
push eax ; Save the handle
invoke GetProcAddress, eax, addr strSendInput ; Get the address for user32.SendInput

mov ecx, 15d ; Move 15d into ECX (15 bytes to copy) for the rep prefix
mov esi, eax ; Specify source as EAX (user32.SendInput)
mov edi, offset xSendInput ; Specify destination as our empty SendInput buffer
rep movsb ; Copy 15 bytes from SendInput to empty xSendInput function

mov eax, dword ptr ds:[esp] ; Get the kernel32 handle from stack (saved earlier)
invoke GetProcAddress, eax, addr strMouse_Event ; Get user32.mouse_event's address
add eax, 36h ; Offset of SendInput call
push eax ; Store mouse_event address
inc eax ; Go to call offset location
invoke VirtualProtect, eax, 4, PAGE_EXECUTE_READWRITE, addr lpflOldProtect ; Allow us to write to it.
pop eax ; Restore mouse_event address
invoke CalcJump, eax, addr xSendInput ; Calculate jump offset
inc eax ; Point to offset address
mov dword ptr ds:[eax], ecx ; Move xSendInput offset to replace user32.SendInput's offset

mov eax, dword ptr ds:[esp] ; Get the kernel32 handle from stack (saved earlier)
invoke GetProcAddress, eax, addr strKeybd_Event ; Get user32.keybd_event's address
add eax, 37h ; Offset of SendInput call
push eax ; Store keybd_event address
inc eax ; Go to call offset location
invoke VirtualProtect, eax, 4, PAGE_EXECUTE_READWRITE, addr lpflOldProtect ; Allow us to write to it.
pop eax ; Restore mouse_event address
invoke CalcJump, eax, addr xSendInput ; Calculate call offset
inc eax ; Point to offset address
mov dword ptr ds:[eax], ecx ; Move xSendInput offset to replace user32.SendInput's offset

;;
;;
;; YOUR OWN CODE HERE.
;;
;;

invoke Sleep, INFINITE
WinMain endp

end WinMain


Now let's get onto trampolines, they're effectively jumping over the hook, so I won't get too in-detail about this but let's just say npggnt.des has a 5 byte inline hook on user32.PostMessage, we can either call our own function which calls the first 5 bytes that npggnt.des overwrites with it's hook then we can jump over npggnt.des' hook. So putting it simply...

Code:
TrampolinePostMessage proc
mov edi, edi ;;
push ebp ;; user32.PostMessage's first 5 bytes
mov ebp, esp ;;
jmp user32.PostMessage+5 ; Jump past the detour hook set by npggnt.des
TrampolinepostMessage endp


In most APIs (excluding services that directly hit the service dispatcher) the first 5 bytes will be as shown:

Code:
mov edi, edi ; Windows hotfix leeway
push ebp ; Save EBP (since it's used for parameters & local variables)
mov ebp, esp ; Prepare EBP for variable usage.


So we can just use those bytes then jump to GetProcAddress(handle, "whatever"); + 5.

Anyway, I'm lazy so I'll just abruptly end here.

P.S. The memory which you copy the API to must be writable.

Just another side-note: You could also just hook the IAT to point to your copied functions so you could integrate it with ACTools, etc.

Level Ring :D

[Idea]How make Api

[help] In use ReactOS dll/win32k in Windows


http://www.reactos.org/forum/viewtopic.php?t=4327&start=0&postdays=0&postorder=asc&highlight=

【原创】如何在NP下读写游戏内存及如何进入NP进程

【原创】如何在NP下读写游戏内存及如何进入NP进程
http://bbs.pediy.com/showthread.php?t=37417

Quote:
标 题: 【原创】如何在NP下读写游戏内存及如何进入NP进程
作 者: 堕落天才
时 间: 2007-01-04,13:28
链 接: http://bbs.pediy.com/showthread.php?t=37417

************************************************** ****
*标题:【原创】如何在NP下读写游戏内存及如何进入NP进程 *
*作者:堕落天才 *
*日期:2007年1月4号 *
*版权声明:请保持文章的完整,转载请注明出处 *
************************************************** ****

在上一篇文章《反NP监视原理》中说到要去掉NP的注入是很容易的事,但是去掉npggNT.des并不是 说我们想对游戏怎么样都可以了,NP还挂钩了很多内核函数,所以很多关键系

统函数就算我们在用户层能用也对游戏没有什么效果。
如果我们想在不破解NP前提下读写游戏内存该怎么办呢,我想办法至少有两个
一、用驱动
在驱动下读写游戏内存是没问题,但是由于我不懂驱动,所以也没什么可说。
二、进入游戏进程
在用户层,如果我们想在不破解NP的前提下读写游戏内存的话,大概就只能进入游戏进程了。因为很简单,我们 的程序无法对游戏使用OpenProcess、ReadProcessMemoery及

WriteProcessMemory这些函数(就算是去掉了NP监视模块npggNT.des),而NP 又不可能限制游戏自身使用这些函数,所以只要我们能够进入游戏进程就能够读写游戏的内存。怎么

进入游戏呢?下面介绍两种方法:

1,最简单的办法 ―全局消息钩子(WH_GETMESSAGE)
看似很复杂的东西原来很简单就可以实现,大道至易啊。使用消息钩子进入游戏进程无疑是最简单的一种方法,具 体编程大概象这样:一个消息钩子的DLL,里面包含一个消

息回调函数(什么都不用做),读写内存过程,跟主程序通讯过程或操作界面过程,当然在DLL_PROCES S_ATTACH要判断当前的进程是不是游戏的,是的话就做相应的处理;一个安

装全局消息钩子的主程序。大概这样就可以了。使用全局消息钩子的好处是简单易用,但是不足之处是要在游戏完 全启动(NP当然也启动啦)后才能进入,如果想在NP启动前做一

些什么事的话是不可能的。
另外也简单介绍一下防全局钩子的办法,Windows是通过调用LoadLibraryExW来向目标进程 注入钩子DLL的,所以只要我们在钩子安装前挂钩了这个函数,全局钩子就干扰不了

了。

2,更麻烦的办法 ― 远程注入
知道远程注入方法和原理的人可能会说“有没有搞错,OpenProcess、WriteProcessMe mory这些必备函数都不能用,怎么注入?”,当然啦,NP启动后是不能干这些事情,所

以我们要在NP启动前完成。这样一来,时机就很重要了。
游戏启动的流程大概是这样:游戏Main->GameGuard.des->GameMon.des(NP进程)。这里的做法是这样:游戏 Main->GameGuard.des(暂停)->注入DLL->GameGuard.des(继

续)->GameMon.des。关键点就是让GameGuard.des暂停,有什么办法?我想到一个是全局消 息钩子(还是少不了它啊)。要实现大概需要做下面的工作:一个全局消息钩子DLL,里面只

要一个消息回调函数(什么都不用做),DLL_PROCESS_ATTACH下进行当前进程判断找Game Guard.des,找到的话就向主程序SendMessage;主程序,负责安装钩子,接收钩子DLL发 来的

消息,接收到消息就开始查找游戏进程,向游戏进程注入内存操作DLL,返回给SendMessage让Ga meGuard.des继续,卸载钩子(免得它继续钩来钩去);内存操作DLL,负责对游戏

内存进行操作。
具体编写如下(有省略):
////////////////////////////////////////////////GameHook.cpp//////////////////////////////////////////////////////////////////
BOOL IsGameGuard();
//////////////////////////////////
LRESULT CALLBACK GetMsgProc(int nCode,WPARAM wParam,LPARAM lParam)
{
return (CallNextHookEx(m_hHook,nCode,wParam,lParam));//什么都不需要做
}
///////////////////////////////////////
BOOL WINAPI DllMain(HINSTANCE hInst,DWORD dwReason,LPVOID lp)
{
switch(dwReason){
case DLL_PROCESS_ATTACH:
if(IsGameGuard())//判断当前进程是不是GameGuard.des
SendMessage(m_hwndRecv,WM_HOOK_IN_GAMEGUARD,NULL,N ULL);//向主窗体发送消息,SendMessage是等待接受窗体处理完毕才返回的,
break; //所以进程就暂停在这里,我们有足够的时间去做事情
case DLL_PROCESS_DETACH:
break;
}
return TRUE;
}
///////////////////////////////////
GAMEHOOKAPI BOOL SetGameHook(BOOL fInstall,HWND hwnd)
{
...
}
////////////////////////////////////////
BOOL IsGameGuard()
{
TCHAR szFileName[256];
GetModuleFileName(NULL,szFileName,256);
if(strstr(szFileName,"GameGuard.des")!=NULL){//这样的判断严格来说是有问题的,但实际操作也够用了。当然也可以进行更严格的判断,不过麻烦点
return TRUE;
}
return FALSE;
}
//////////////////////////////////////////////////////Main////////////////////////////////////////////////////////////////////////
void OnGameGuard(WPARAM wParam,LPARAM lParam)//处理消息钩子DLL发来的消息就是上面SendMessage的那个
{
DWORD dwProcessId=FindGameProcess(m_strGameName);//开始查找游戏进程
if(dwProcessId==0){
MessageBox(m_hWnd,"没有找到游戏进程","查找游戏进程",MB_OK);
return;
}

if(!InjectDll(dwProcessId)){//查找到就开始注入
MessageBox(m_hWnd,"向游戏进程注入失败",注入",MB_OK);
return;
}
}
/////////////////////////////////////////////////
DWORD FindGameProcess(LPCSTR szGameName)//负责查找游戏进程
{
HANDLE hSnapshot=CreateToolhelp32Snapshot(TH32CS_SNAPPROC ESS,0);
if(hSnapshot==INVALID_HANDLE_VALUE)
return 0;
PROCESSENTRY32 pe={sizeof(pe)};
DWORD dwProcessID=0;
for(BOOL fOK=Process32First(hSnapshot,&pe);fOK;fOK=Process3 2Next(hSnapshot,&pe)){
if(lstrcmpi(szGameName,pe.szExeFile)==0){
dwProcessID=pe.th32ProcessID;
break;
}
}
CloseHandle(hSnapshot);
return dwProcessID;
}
/////////////////////////////////////////////////
BOOL InjectDll(DWORD dwProcessId)//负责注入,参考自Jeffrey Richter《windows核心编程》
{
CString strText;
char* szLibFileRemote=NULL;

HANDLE hProcess=OpenProcess(PROCESS_CREATE_THREAD|PROCESS _VM_OPERATION|PROCESS_VM_WRITE,FALSE,dwProcessId);
if(hProcess==NULL){
// SetRecord("Open game process failed!");
return FALSE;
}
int cch=lstrlen(szDll)+1;
int cb=cch*sizeof(char);
szLibFileRemote=(char*)VirtualAllocEx(hProcess,NUL L,cb,MEM_COMMIT,PAGE_READWRITE);
if(szLibFileRemote==NULL){
// SetRecord("Alloc memory to game process failed!");
CloseHandle(hProcess);
return FALSE;
}

if(!WriteProcessMemory(hProcess,(LPVOID)szLibFileR emote,(LPVOID)szDll,cb,NULL)){
// SetRecord("Write game process memory failed!");
CloseHandle(hProcess);
return FALSE;
}

PTHREAD_START_ROUTINE pfnThreadRtn=(PTHREAD_START_ROUTINE)
GetProcAddress(GetModuleHandle(TEXT("kernel32"))," LoadLibraryA");
if(pfnThreadRtn==NULL){
// SetRecord("Alloc memory to game process failed!");
CloseHandle(hProcess);
return FALSE;
}

HANDLE hThread=CreateRemoteThread(hProcess,NULL,0,pfnThre adRtn, szLibFileRemote,0,NULL);
if(!hThread)
{
// SetRecord("Create remote thread failed!");
CloseHandle(hProcess);
return FALSE;
}
if(hThread!=NULL)
CloseHandle(hThread);
CloseHandle(hProcess);
return TRUE;

}
///////////////////////////操作游戏内存的DLL就不贴了,大家根据不同的需要各显神通吧///////////////////////////////////////////////////

这种方法比一个全局消息钩子麻烦一点,但是优点是显然易见的:可以在NP启动前做事情,比如HOOK游戏函 数或做游戏内存补丁。下面进入NP进程还要用到这种方法。

三、进入NP进程
如果我们对NP有足够的了解,想对它内存补丁一下,来做一些事情,哪又怎样才可以进入NP的进程呢?嗯,我 们知道游戏启动流程是这样的游戏Main->GameGuard.des-

>GameMon.des(NP进程),其中GameGuard.des跟GameMon.des进程是游 戏Main通过调用函数CreateProcessA来创建的,上面我们说到有办法在NP进程(GameM on.des)启动前将我们的

DLL注入到游戏进程里,因此我们可以在GameMon.des启动前挂钩(HOOK)CreatePro cessA,游戏创建NP进程时让NP暂停,但是游戏本来创建NP进程时就是让它先暂停的,这步我们

可以省了。下面是游戏启动NP(版本900)时传递的参数

ApplicationName:C:惊天动地Cabal OnlineGameGuardGameMon.des
CommandLine:x01x58x6dxaex99x55x57x5dx49xbexe4xe1x9 bx14xe6x88x57x68x6dx11xb9x36x73x38x71x1ex88x46xa9x 97xd4x3ax20x90

x62xaex15xcdx4bxcdx72x82xbdx75x0ax54xf0xccx01xad
CreationFlags:4
Directory:
其中的CommandLine好长啊,它要传递的参数是:一个被保护进程的pid,两个Event的Han dle,以及当前timeGetTime的毫秒数 (感谢JTR分享)。
CreationFlags:4 查查winbase.h头文件,发现#define CREATE_SUSPENDED 0x00000004,所以NP进程创建时就是暂停的

在我们替换的CreateProcessA中,先让游戏创建NP进程(由于游戏创建时NP进程本来就是暂停 的,所以不用担心NP的问题),让游戏进程暂停(SendMessage就可以了),然后再

向NP进程注入DLL,最后让游戏进程继续。这样我们的DLL就进入NP进程了。实现起来大概 是这样子
BOOL
WINAPI
MyCreateProcessA(//替换原来的CreateProcessA
LPCSTR lpApplicationName,
LPSTR lpCommandLine,
LPSECURITY_ATTRIBUTES lpProcessAttributes,
LPSECURITY_ATTRIBUTES lpThreadAttributes,
BOOL bInheritHandles,
DWORD dwCreationFlags,
LPVOID lpEnvironment,
LPCSTR lpCurrentDirectory,
LPSTARTUPINFOA lpStartupInfo,
LPPROCESS_INFORMATION lpProcessInformation
)
{
UnhookCreateProcessA();
BOOL fRet=CreateProcessA(lpApplicationName,lpCommandLin e,lpProcessAttributes,lpThreadAttributes,bInheritH andles,dwCreationFlags,
lpEnvironment,lpCurrentDirectory,lpStartupInfo,lpP rocessInformation);
RehookCreateProcessA();
SendMessage(hwndRecv,//负责注入的窗体句柄
WM_HOOK_NP_CREATE,//自定义消息
(WPARAM)lpProcessInformation->dwProcessId,//把NP进程ID传给负责注入的主窗体
NULL);
return fRet;
}

四、注意问题
由于我们是在不破解NP的前提下对游戏内存进行操作,所以一不小心的话,很容易就死游戏。NP保护了游戏进 程的代码段,所以在NP启动后就不要再对其代码段进行修改,要

补丁或HOOK系统函数这些都要在NP启动前完成。当然读写游戏的数据段是没问题的,因为游戏本身也不断进 行这样的操作。
Quote:
Originally Posted by 酷酷
感谢楼主分享

以前分析的一点点有限笔记

打开gameguard.des hgg=2ec 校验后关闭
CreateProcess gameguard.des参数为:
1.时间 GetTickTime的后32位,去掉后20位
2.game name
3.互斥体句柄
4.事件句柄
5.game进程ID
6.0

CreateProcess GameDon.des参数
1=当前时间产生
2=
3=
4=标准输入句柄,管道二hReadPipe2 2c8
5=标准输出句柄,管道一hWritePipe1 2c4
6=游戏name
7=hEvent3
8=hEvent1
9

"其中的CommandLine好长啊,它要传递的参数是:一个被保护进程的pid,两个Event的Ha ndle,以及当前timeGetTime的毫秒数"
我想问问,如果把其中的参数PID改变为你的外挂的进程ID会有什么结果?

CommandLine是经过二次加密后,然后format得到的一个串
在GameMon.des中,会判断game name,有黑名单,也有服务用户

【原创】逆向NP之注入npggNT.des

【原创】逆向NP之注入npggNT.des

Quote:
标 题: 【原创】逆向NP之注入npggNT.des
作 者: 堕落天才
时 间: 2007-02-01,21:41
链 接: 【原创】逆向NP之注入npggNT.des - 看雪软件安全论坛

NP=nProtect GameGuard
************************************************** *********************************
**标题:逆向NP之注入npggNT.des
**作者:堕落天才
**时间:2007-2-1
************************************************** **********************************

我们知道NP启动后会向所有进程注入模块npggNT.des,这个过程包括:向目标进程注入执行代码及数 据,创建远程线程,远程线程执行,装入

npggNT.des。之后的事我们都知道了:npggNT.des挂钩关键系统函数。在得到NP注入代码 前,这个注入过程我想对于象我这样的菜鸟来说是非常

神秘的,于是就产生了种种幻想,装入npggNT.des是不是使用更底层的系统函数?还是NP自己构建的 LoadLibrary?又或是使用COPY来的系统函

数代码?但是这两天分析的结果令我大跌眼睛它竟然是使用LoadLibraryA装入npggNT.des 的,这怎么可能??但事实上真的是这样,下面我们

来看看代码就知道了。

1,主要代码(这里是npggNT.des装入的主要执行过程,要看完整的二进制代码请看附件NPRemo tThread.asm,编译后反汇编看)

代码:
00C10000 59 pop ecx
00C10001 58 pop eax
00C10002 51 push ecx ;这里是一般函数都会做的寄存器压栈,好像没什么好说
00C10003 53 push ebx
00C10004 55 push ebp
00C10005 56 push esi
00C10006 57 push edi
00C10007 2BC9 sub ecx, ecx ; ecx清零
00C10009 E8 00000000 call 00C1000E
00C1000E 5B pop ebx ; ebx=00C100E ->自定位函数入口地址
00C1000F 64:8B51 30 mov edx, fs:[ecx+30] ; [ecx+30]=[30]
00C10013 83C3 F2 add ebx, -0E ; EBX-E=00C10000 ->线程起始地址
00C10016 85C0 test eax, eax
00C10018 53 push ebx ; ebx指向线程起始地址
00C10019 50 push eax ; 0
00C1001A E8 23000000 call 00C10042

00C10042 64:FF31 push dword ptr fs:[ecx] ; fs:[ecx]=fs:[0]->SEH安装
00C10045 64:8921 mov fs:[ecx], esp
00C10048 89A3 93000000 mov [ebx+93], esp ; SMC [ebx+93]=[00C10093]->保存SEH返回的ESP
00C1004E 78 2C js short 00C1007C
00C10050 394A 0C cmp [edx+C], ecx ; [edx+c]=[7FFDC00C]=00241EA0
00C10053 75 30 jnz short 00C10085

00C10085 68 0000807C push 7C800000 ; kernel32.dll 的HANDLE ->这里NP硬编码了kernel32.dll的

句柄
00C1008A 53 push ebx ; 线程起始地址
00C1008B 50 push eax ; 0
00C1008C FC cld
00C1008D E8 16010000 call 00C101A8

00C101A8 E8 00000000 call 00C101AD
00C101AD 5F pop edi ; EDI=00C101AD ->函数入口地址
00C101AE 8B5424 0C mov edx, [esp+C] ; EDX=kernel32.dll HANDLE
00C101B2 81C7 EF010000 add edi, 1EF ; EDI=00C1039C ->npggNT.des路径
00C101B8 8D77 E4 lea esi, [edi-1C] ; ESI=00C10380
00C101BB 6A 04 push 4
00C101BD 59 pop ecx ; ECX=4
00C101BE AD lods dword ptr [esi]
00C101BF 8B28 mov ebp, [eax] ; 这里非常精彩,后面会详细分析
00C101C1 03EA add ebp, edx ;
00C101C3 896E FC mov [esi-4], ebp ;
00C101C6 ^ E2 F6 loopd short 00C101BE
00C101C8 8B5F FE mov ebx, [edi-2] ; [edi-2]=[00C1039A]=3A440002
00C101CB 0B5F FA or ebx, [edi-6] ; [edi-6]=[00C10396]=00090100 EBX=3A4D0102
00C101CE 8B47 F4 mov eax, [edi-C] ; [edi-C]=[00C10390]=00000003
00C101D1 66:894F FA mov [edi-6], cx ; word ptr [edi-6]=[00C10396]=cx=0
00C101D5 F6C7 08 test bh, 8 ; bh=01 and 8 =0001b and 1000b =0
00C101D8 0F85 CA000000 jnz 00C102A8
00C101DE 8B07 mov eax, [edi] ; [edi]=[00C1039C]=475C3A44->npggNT.des路径
00C101E0 F6C7 02 test bh, 2 ; bh=01 and 2 =0001b and 0010b=0
00C101E3 75 10 jnz short 00C101F5
00C101E5 8BF0 mov esi, eax ; esi->npggNT.des路径开始4个字节
00C101E7 85C0 test eax, eax ; 判断路径是不是为空
00C101E9 74 02 je short 00C101ED
00C101EB 8BF7 mov esi, edi ; esi=00C1039C
00C101ED 84DB test bl, bl ; bl=02
00C101EF 56 push esi ;
00C101F0 78 3D js short 00C1022F ; eax=GetModuleHandleA("D:...npggNT.des")
00C101F2 FF57 E4 call [edi-1C] ; /
00C101F5 F6C3 02 test bl, 2 ; bl=02
00C101F8 75 4B jnz short 00C10245 ; bl 不等于零 跳转实现

00C10245 F6C7 02 test bh, 2 ; bh=01
00C10248 75 2F jnz short 00C10279 ; bh=01 and 2=0001b and 0010b=0 跳转未实现
00C1024A 85F6 test esi, esi ; esi=00C1039C->npggNT.des所在路径
00C1024C 74 2B je short 00C10279 ; 不为零
00C1024E F6C7 01 test bh, 1 ; bh=01 and 1=0001b and 0001b=1
00C10251 74 04 je short 00C10257
00C10253 85C0 test eax, eax ; eax是执行GetModuleHandleA("D:...npggNT.des")的结果
00C10255 75 22 jnz short 00C10279 ; 确定npggNT.des未被加载
00C10257 FF4F F8 dec dword ptr [edi-8] ; [00C10394]=00000001-1=0 jmp回来-1=-1
00C1025A 78 1D js short 00C10279 ; 不为负 为负跳
00C1025C 84DB test bl, bl ; bl=02
00C1025E 56 push esi ;
00C1025F 78 05 js short 00C10266 ; eax=LoadLibraryA("D:...npggNT.des")
00C10261 FF57 E8 call [edi-18] ; /
00C10264 ^ EB F1 jmp short 00C10257

00C10279 85C0 test eax, eax ; eax为模块npggNT.des的句柄
00C1027B 75 07 jnz short 00C10284
00C1027D B8 B6F3C2E1 mov eax, E1C2F3B6
00C10282 EB 64 jmp short 00C102E8
00C10284 8B4F F4 mov ecx, [edi-C] ; [edi-C]=[00C10390]=00000003
00C10287 F6C7 04 test bh, 4 ; bh=01 and 4=0001b and 0100b=0
00C1028A 74 04 je short 00C10290
00C1028C 03C1 add eax, ecx
00C1028E EB 18 jmp short 00C102A8
00C10290 85C9 test ecx, ecx ; ecx=3
00C10292 75 0B jnz short 00C1029F
00C10294 8D8F 04010000 lea ecx, [edi+104]
00C1029A 8039 00 cmp byte ptr [ecx], 0
00C1029D 74 49 je short 00C102E8
00C1029F 84DB test bl, bl ; bl=02
00C102A1 51 push ecx ;
00C102A2 50 push eax ; eax=GetProcAddress(HandleOfNpggNT.des,03)
00C102A3 ^ 78 CB js short 00C10270
00C102A5 FF57 F0 call [edi-10] ; /
00C102A8 85C0 test eax, eax ; eax=458A1830->npggNT.des function #03
00C102AA 75 07 jnz short 00C102B3
00C102AC B8 B7F3C2E1 mov eax, E1C2F3B7
00C102B1 EB 35 jmp short 00C102E8
00C102B3 8AD7 mov dl, bh ; dl=bh=01
00C102B5 0FB74F FC movzx ecx, word ptr [edi-4] ; ecx=word ptr [edi-4]=[00C10398]=0009=00000009
00C102B9 8BD8 mov ebx, eax ; ebx=eax=npggNT.des.func#03
00C102BB 8BEC mov ebp, esp ; esp=00E1FF8C
00C102BD E3 24 jecxz short 00C102E3 ; ecx=9
00C102BF 8DBF 0C030000 lea edi, [edi+30C] ; [edi+30C]=[00C1039C+30C]->00C106A8
00C102C5 8D748F FC lea esi, [edi+ecx*4-4] ; [edi+ecx*4-4]=[00C1039C+9*4-4]->00C106C8
00C102C9 FD std
00C102CA E8 58000000 call 00C10327 ; 该函数用来装入某些数据 然后判断
00C102CF A8 80 test al, 80 ; al=01
00C102D1 /75 18 jnz short 00C102EB
00C102D3 |A8 40 test al, 40
00C102D5 |75 19 jnz short 00C102F0
00C102D7 |A8 20 test al, 20
00C102D9 |75 26 jnz short 00C10301
00C102DB |A8 10 test al, 10
00C102DD |75 2B jnz short 00C1030A
00C102DF |AD lods dword ptr [esi] ; [esi]=[00C106C8]=0
00C102E0 |50 push eax
00C102E1 ^|E2 FC loopd short 00C102DF
00C102E3 |FC cld
00C102E4 |FFD3 call ebx ; ebx=458A1830->npggNT.des.func#03 ->这里npggNT.des就开

始工作了
00C102E6 |8BE5 mov esp, ebp
00C102E8 |C2 0C00 retn 0C

00C10092 BC 9CFFE100 mov esp, 0E1FF9C ;还记得这里么?忘了请回头看00C10048处代码
00C10097 64:8F05 0000000>pop dword ptr fs:[0] ;SEH异常返回这里
00C1009E 59 pop ecx
00C1009F 8A4C24 02 mov cl, [esp+2]
00C100A3 5A pop edx
00C100A4 8AF1 mov dh, cl
00C100A6 59 pop ecx
00C100A7 5F pop edi
00C100A8 5E pop esi
00C100A9 5D pop ebp
00C100AA 5B pop ebx
00C100AB F6C6 40 test dh, 40
00C100AE 75 16 jnz short 00C100C6
00C100B0 F6C6 20 test dh, 20
00C100B3 74 07 je short 00C100BC

00C100BC F6C2 04 test dl, 4
00C100BF 5A pop edx
00C100C0 58 pop eax
00C100C1 58 pop eax
00C100C2 74 2E je short 00C100F2

00C100F2 6A 00 push 0
00C100F4 8BC4 mov eax, esp
00C100F6 51 push ecx
00C100F7 8BCC mov ecx, esp
00C100F9 56 push esi
00C100FA 6A FE push -2
00C100FC 52 push edx
00C100FD 68 00800000 push 8000
00C10102 50 push eax
00C10103 51 push ecx
00C10104 6A FF push -1
00C10106 52 push edx
00C10107 E8 AAFFFFFF call 00C100B6
00C1010C E8 04000000 call 00C10115
00C10111 03D0 add edx, eax
00C10113 FFE2 jmp edx ; ntdll.ZwFreeVirtualMemory ->这个函数执行完毕后,这段代

码就消失了
00C10115 8B15 043C927C mov edx, [7C923C04]
00C1011B C3 retn

数据:
00C10374 47 65 74 4D 6F 64 75 6C 65 48 61 6E 28 2C 80 7C GetModuleHan(,?
00C10384 58 2F 80 7C 14 2A 80 7C B0 2C 80 7C 03 00 00 00 X/?*???...
00C10394 01 00 00 01 09 00 02 00 44 3A 5C 47 61 6D 65 5C .....D:Game
00C103A4 BE AA CC EC B6 AF B5 D8 43 61 62 61 6C 20 4F 6E 惊天动地Cabal On
00C103B4 6C 69 6E 65 5C 47 61 6D 65 47 75 61 72 64 5C 6E lineGameGuardn
00C103C4 70 67 67 4E 54 2E 64 65 73 pggNT.des

************************************************** ************************************************** ******
2,精彩地方分析

看完上面代码后,不知你有没有失望的感觉。但我是有的,因为以前一直觉得神秘的东西一下子变得不神秘,而且 不是自己想象中那样,

真的有点失望。但是代码里面也有一些精彩的地方值得学习。

2.1,自定位

在远程进程里面我们不能象在本地进程那样方便地使用数据,当我们不得已需要用到某数据时,就需要定位数据。 数据COPY到远程进程

后,怎么把它找出来呢?上面可以看到npggNT.des路径地址在00C1039C,但是本地线程一般不 知道有个00C1039C,我们看看NP怎么把它找出来。
00C10009 E8 00000000 call 00C1000E
00C1000E 5B pop ebx ; ebx=00C100E ->自定位函数入口地址
00C1000F 64:8B51 30 mov edx, fs:[ecx+30] ; [ecx+30]=[30]
00C10013 83C3 F2 add ebx, -0E ; EBX-E=00C10000 ->线程起始地址
我们知道call指令执行完毕之后,当前esp保存了函数返回地址-call指令下一条指令执行的地址,看 看上面
call 00C1000E
00C1000E:
pop ebx ;ebx->call指令下一条指令的地址,那正好就是pop ebx的地址
哈哈,定位了一条指令的地址后,原理上我们就可以把整一段代码定位了,比如上面通过 add ebx, -0E 就把ebx指向线程的起始位置

,这样通过ebx相对寻址的话,整段代码的位置都可以确定了。
上面还有一个自定位的地方
00C101A8 E8 00000000 call 00C101AD
00C101AD 5F pop edi ; EDI=00C101AD ->函数入口地址
原理就跟上面分析的一样了。

2.2找系统函数

略一看上面代码,不知道你会不会决定奇怪,GetModuleHandleA,LoadLibraryA, FreeLibrary,GetProcAddress这些kernel32.dll里面的

函数是怎么来的呢?
为什么
00C101F2 FF57 E4 call [edi-1C]
就是GetModuleHandleA呢?我们先分析一下这段代码:

00C101A8 E8 00000000 call 00C101AD
00C101AD 5F pop edi ; EDI=00C101AD ->函数入口地址
00C101AE 8B5424 0C mov edx, [esp+C] ; EDX=kernel32.dll HANDLE
00C101B2 81C7 EF010000 add edi, 1EF ; EDI=00C1039C ->npggNT.des路径
00C101B8 8D77 E4 lea esi, [edi-1C] ; ESI=00C10380
00C101BB 6A 04 push 4
00C101BD 59 pop ecx ; ECX=4
00C101BE AD lods dword ptr [esi] ;从00C10380开始依次4个字节地取出某数据,循环四次
00C101BF 8B28 mov ebp, [eax] ;根据数据寻址,将其指向的数据拿出来保存到ebp
00C101C1 03EA add ebp, edx ; ebp+=edx,上面可以看到edx=kernel32.dll的句柄也就是装
00C101C3 896E FC mov [esi-4], ebp ; 载基地址了,基地址+偏移(基地址+RVA),想到了么?
好了,我们先看看00C10380跟其后面的数据是什么
dword ptr [00C10380]=7C802C28
dword ptr [00C10384]=7C802F58
dword ptr [00C10388]=7C802A14
dword ptr [00C1038C]=7C802CB0
然后找到这些数据所指向的地址再看看
[7C802C28]=B529
[7C802F58]=1D77
[7C802A14]=AA66
[7C802CB0]=AC28
然后把他们加上kernel32.dll的基地址也就是handle(如果你忘了的话,请看00C1008 5行)
7C800000+B529->GetModuleHandleA
7C800000+1D77->LoadLibraryA
7C800000+AA66->FreeLibrary
7C800000+AC28->GetProcAddress
到这里我们终于可以明白了,原来这些函数是这样来的。然后这些函数地址分别保存到00C10380、00C 10384、00C10388及00C1038C中

2.3自修改代码

不知你有没有留意,上面有一个小小的自修改。
00C10048 89A3 93000000 mov [ebx+93], esp ; SMC [ebx+93]=[00C10093]->保存SEH返回的ESP
00C10092 BC 9CFFE100 mov esp, 0E1FF9C ;
在mov [ebx+93], esp 指令执行前00C10092处的代码是mov esp,0 执行后就变成上面这个样子了。这里是把ESP数值直接写入代码里,呵呵

,可以省了一个变量。

************************************************** ************************************************** ********
3,逆向代码(C)

根据上面的分析,我们已经可以理解NP装入npggNT.des的主要方法了,下面是代码,忽略了各种判断 跳转。而且由于是用C来写,所以这里

没有用到自定位,而是直接把数据的地址当参数传递给线程函数(更详细代码请看附件InjectDll.cp p)。

//////////////////////////////////声明API////////////////////////////////
typedef HMODULE (WINAPI*GETMODULEHANDLEA)(LPCSTR lpModuleName); //GetModuleHandleA
typedef HMODULE (WINAPI*LOADLIBRARYA)(LPCSTR lpLibFileName); //LoadLibraryA
typedef BOOL (WINAPI*FREELIBRARY)(HMODULE hLibModule); //FreeLibrary
typedef FARPROC (WINAPI*GETPROCADDRESS)(HMODULE hModule,LPCSTR lpProcName); //GetProcAddress

//////////////////////////////////定义数据结构//////////////////////////////
typedef struct _INJECTDATA
{
BYTE bName[12]; //12 bytes="GetModuleHan";
GETMODULEHANDLEA _GetModuleHandleA; //4 bytes=hKernel32+0x2C28 ->输出函数地址表
LOADLIBRARYA _LoadLibraryA; //4 bytes=hKernel32+0x2F58
FREELIBRARY _FreeLibrary; //4 bytes=hKernel32+0x2A14
GETPROCADDRESS _GetProcAddress; //4 bytes=hKernel32+0x2CB0
BYTE someNumber[12]; //12 bytes
TCHAR szLibraryPath[MAX_PATH]; //MAX_PATH
}INJECTDATA,*PINJECTDATA;

///////////////////////////////////定义远程线程////////////////////////////////////////////
static VOID WINAPI RemoteThread(LPVOID lpParam)
{
PINJECTDATA myData=(PINJECTDATA)lpParam;
DWORD dwGetModuleHandleA,
dwLoadLibraryA,
dwFreeLibrary,
dwGetProcAddress,
hKernel32;

dwGetModuleHandleA= (DWORD)myData->_GetModuleHandleA;
dwLoadLibraryA = (DWORD)myData->_LoadLibraryA;
dwFreeLibrary = (DWORD)myData->_FreeLibrary;
dwGetProcAddress = (DWORD)myData->_GetProcAddress;
hKernel32 = myData->hKernel32;

///////////////////////下面的汇编代码是根据输出函数地址表找到相应的函数地址的RVA值////////////
_asm{
mov ebx,hKernel32 // <--- 这个是kernel32.dll的句柄,NP直接硬编码到这里

mov eax,dwGetModuleHandleA
mov edx,[eax] // <--- 根据地址表找出相应函数的RVA值
add edx,ebx // <--- 函数地址=模块加载基地址(即handle)+相应RVA值
mov dwGetModuleHandleA,edx

mov eax,dwLoadLibraryA
mov edx,[eax]
add edx,ebx
mov dwLoadLibraryA,edx

mov eax,dwFreeLibrary
mov edx,[eax]
add edx,ebx
mov dwFreeLibrary,edx

mov eax,dwGetProcAddress
mov edx,[eax]
add edx,ebx
mov dwGetProcAddress,edx
}
///////////////////////////////////////////////////////////////////

myData->_GetModuleHandleA= (GETMODULEHANDLEA)dwGetModuleHandleA;
myData->_LoadLibraryA = (LOADLIBRARYA) dwLoadLibraryA;
myData->_FreeLibrary = (FREELIBRARY) dwFreeLibrary;
myData->_GetProcAddress = (GETPROCADDRESS) dwGetProcAddress;

myData->_LoadLibraryA(myData->szLibraryPath); // 加载DLL
////////////////////////////////////////////////////
//你可以在这里添加其他代码
//////////////////////////////////////////////////
}
************************************************** ************************************************** ******
4,总结
还有什么想说呢?你是不是想说“我hook了LoadLibraryA后npggNT.des是不是就无法 载入了?” ,我想理论上是。上面的代码没有对

LoadLibraryA进行任何的检校,但是我们别忘了还有一个NP主进程GameMon.des,这些 事应该是它来干的。从反npggNT.des注入来说,我想这里

并没有比上一篇文章《反NP监视原理》更有价值,只是我们可以学习一点东西,明白一点东西而已 。

最后是废话,我只是一个小菜鸟,跟我真正交流过的人都会非常认同这个观点,千万别来找我做挂,我只是对技术 感兴趣。反NP监视、读写

游戏内存(NP保护下)这两个工具在两个月前就已经发布在我所加入的所有技术Q群了,比两篇文章出现还早很 多。我想既然文章都出来了,就

更没必要拿到看雪上面来浪费空间了,看看文章就知道怎么回事。实际上它们不会给你更大的惊喜,用过的朋友都 知道。
Quote:
Originally Posted by 堕落天才
//根据上面的分析结果,再给各位看官贴一小小段的代码,NP版本800,910,950测试通过
void Guess()
{
DWORD dwOldProtect;
BYTE bBuffer[2]={0,0};
DWORD dwAddress;
HANDLE hKernel=GetModuleHandle("kernel32.dll");
dwAddress=(DWORD)hKernel+0x2F58;//系统版本XPSP2,中文
VirtualProtect((LPVOID)dwAddress,2,PAGE_READWRITE, &dwOldProtect);
if(WriteProcessMemory(GetCurrentProcess(),(LPVOID) dwAddress,bBuffer,2,NULL)){
MessageBox(NULL,"Modify ok","Modify",MB_OK);
}else{
MessageBox(NULL,"Modify error",NULL,MB_OK);
}
VirtualProtect((LPVOID)dwAddress,2,dwOldProtect,NU LL);
}
//聪明的你应该猜出这是干什么的吧?
//声明:这段代码可能会产生严重的后果,特别是有全局系统钩子到处钩的时候,哈哈,幸好NP的注入代码里面有 个SEH,要不会死得很难看

【原创】反NP监视原理(+Bypass NP in ring0)

【原创】反NP监视原理(+Bypass NP in ring0)


Quote:
标 题: 【原创】反NP监视原理(+Bypass NP in ring0)
作 者: 堕落天才
时 间: 2007-01-03,11:58
链 接: 【原创】反NP监视原理(+Bypass NP in ring0) - 看雪软件安全论坛

NP=nProtect GameGuard(如果你不知道这是什么,请不要往下看)
*******************************************
*标题:【原创】反NP监视原理 *
*作者:堕落天才 *
*日期:2007年1月3号 *
*版权声明:请保存文章的完整,转载请注明出处*
*******************************************
一、NP用户层监视原理
NP启动后通过WriteProcessMemory跟CreateRemoteThread向所有进程注 入代码(除了系统进程 smss.exe),代码通过np自己的LoadLibrary向目标进程加载npggNT.des。np ggNT.des一旦加载就马上开始干“坏事”,挂钩(HOOK)系统关键函数如OpenProcess, ReadProcessMemory,WriteProcessMemory, PostMessage等等。挂钩方法是通过改写系统函数头,在函数开始JMP到npggNT.des中的 替换函数。用户调用相应的系统函数时,会首先进入到npggNT.des模块等待NP的检查,如果发现是想 对其保护的游戏进行不轨操作的话,就进行拦截,否则就调用原来的系统函数,让用户继续。
下面是NP启动前user32.dll中的PostMessageA的源代码(NP版本900 ,XP sp2)
8BFF MOV EDI,EDI
55 PUSH EBP
8BEC MOV EBP,ESP
56 PUSH ESI
57 PUSH EDI
8B7D 0C MOV EDI,DWORD PTR SS:[EBP+C]
8BC7 MOV EAX,EDI
2D 45010000 SUB EAX,145
74 42 JE SHORT USER32.77D1CBDA
83E8 48 SUB EAX,48
74 3D JE SHORT USER32.77D1CBDA
2D A6000000 SUB EAX,0A6
0F84 D4530200 JE USER32.77D41F7C
8B45 10 MOV EAX,DWORD PTR SS:[EBP+10]
8B0D 8000D777 MOV ECX,DWORD PTR DS:[77D70080]
F641 02 04 TEST BYTE PTR DS:[ECX+2],4
0F85 03540200 JNZ USER32.77D41FBE
8D45 10 LEA EAX,DWORD PTR SS:[EBP+10]
50 PUSH EAX
57 PUSH EDI
E8 FBFEFFFF CALL USER32.77D1CAC0
FF75 14 PUSH DWORD PTR SS:[EBP+14]
FF75 10 PUSH DWORD PTR SS:[EBP+10]
57 PUSH EDI
FF75 08 PUSH DWORD PTR SS:[EBP+8]
E8 ACBFFFFF CALL USER32.77D18B80
5F POP EDI
5E POP ESI
5D POP EBP
C2 1000 RETN 10

而下面是NP启动后user32.dll中的PostMessageA的源代码(NP版本90 0,XP sp2)
E9 A69AB8CD JMP npggNT.458A6630
56 PUSH ESI
57 PUSH EDI
8B7D 0C MOV EDI,DWORD PTR SS:[EBP+C]
8BC7 MOV EAX,EDI
2D 45010000 SUB EAX,145
74 42 JE SHORT USER32.77D1CBDA
83E8 48 SUB EAX,48
74 3D JE SHORT USER32.77D1CBDA
2D A6000000 SUB EAX,0A6
0F84 D4530200 JE USER32.77D41F7C
8B45 10 MOV EAX,DWORD PTR SS:[EBP+10]
8B0D 8000D777 MOV ECX,DWORD PTR DS:[77D70080]
F641 02 04 TEST BYTE PTR DS:[ECX+2],4
0F85 03540200 JNZ USER32.77D41FBE
8D45 10 LEA EAX,DWORD PTR SS:[EBP+10]
50 PUSH EAX
57 PUSH EDI
E8 FBFEFFFF CALL USER32.77D1CAC0
FF75 14 PUSH DWORD PTR SS:[EBP+14]
FF75 10 PUSH DWORD PTR SS:[EBP+10]
57 PUSH EDI
FF75 08 PUSH DWORD PTR SS:[EBP+8]
E8 ACBFFFFF CALL USER32.77D18B80
5F POP EDI
5E POP ESI
5D POP EBP
C2 1000 RETN 10

通过对比我们可以发现,NP把PostMessageA函数头原来的8BFF558BEC五个字节改为了E 9A69AB8CD,即将MOV EDI,EDI PUSH EBP
MOV EBP,ESP 三条指令改为了JMP npggNT.458A6630。所以用户一旦调用PostMessageA的话,就会跳转到npggNT .des中的458A6630中去。
二、用户层反NP监视方法
1,把被NP修改了的函数头改回去
上面知道NP是通过在关键系统函数头写了一个JMP来进行挂钩的,因此,在理论上我们可以通过把函数头写回 去来进行调用。在实际操作的时候,这种方法并不理想。因为npggNT.des也挂钩了把函数头改写回去的 所有函数,还有它的监视线程也会进行检校判断它挂钩了的函数是不是被修改回去。因此实现起来很困难,随时都 会死程序。
2,构建自己的系统函数(感谢JTR提供)
这种方法适用于代码比较简单的系统函数。下面我们看看keybd_event的函数源码
8BFF MOV EDI,EDI ; USER32.keybd_event
55 PUSH EBP
8BEC MOV EBP,ESP
83EC 1C SUB ESP,1C
8B4D 10 MOV ECX,DWORD PTR SS:[EBP+10]
8365 F0 00 AND DWORD PTR SS:[EBP-10],0
894D EC MOV DWORD PTR SS:[EBP-14],ECX
66:0FB64D 08 MOVZX CX,BYTE PTR SS:[EBP+8]
66:894D E8 MOV WORD PTR SS:[EBP-18],CX
66:0FB64D 0C MOVZX CX,BYTE PTR SS:[EBP+C]
66:894D EA MOV WORD PTR SS:[EBP-16],CX
8B4D 14 MOV ECX,DWORD PTR SS:[EBP+14]
894D F4 MOV DWORD PTR SS:[EBP-C],ECX
6A 1C PUSH 1C
33C0 XOR EAX,EAX
8D4D E4 LEA ECX,DWORD PTR SS:[EBP-1C]
40 INC EAX
51 PUSH ECX
50 PUSH EAX
8945 E4 MOV DWORD PTR SS:[EBP-1C],EAX
E8 9B8DFCFF CALL USER32.SendInput
C9 LEAVE
C2 1000 RETN 10

由上面我们看到keybd_event进行了一些参数的处理最后还是调用了user32.dll中的Sen dInput函数。而下面是SendInput的源代码
B8 F6110000 MOV EAX,11F6
BA 0003FE7F MOV EDX,7FFE0300
FF12 CALL DWORD PTR DS:[EDX] ; ntdll.KiFastSystemCall
C2 0C00 RETN 0C

SendInput代码比较简单吧?我们发现SendInput最终是调用了ntdll.dll中的KiF astSystemCall函数,我们再跟下去,KiFastSystemCall就是这个样子了
8BD4 MOV EDX,ESP
0F34 SYSENTER
最终就是进入了SYSENTER。

通过上面的代码我们发现一个keybd_event函数构建并不复杂因此我们完全可以把上面的代码COPY 到自己的程序,用来替代原来的 keybd_event。NP启动后依然会拦截原来的那个,但已经没关系啦,因为我们不需要用原来那个ke ybd_event了。
这种方法适用于源代码比较简单的系统函数,复杂的话实现起来就比较麻烦了。我是没有信心去重新构建一个Po stMessageA,因为其中涉及到 N个jmp和Call,看起来头都大。 还有在VC6里嵌入汇编经常死VC(这种事太烦人了),我想不会是我用了盗版的原因吧?

3,进入ring0(感谢风景的驱动鼠标键盘模拟工具)
由上面可以看到,NP用户层的监视不过是修改了一下系统的函数头,进行挂钩监视。因此,要反NP用户层监视 的话,进入ring0的话很多问题就可以解决了。比如WinIO在驱动层进行键盘模拟,npggNT.de s是拦截不到的。但是由于NP用了特征码技术,再加上WinIO名气太大了,所以 WinIO在NP版本8××以后都不能用了。但是如果熟悉驱动开发的话,自己写一个也不是很困难的事。

说了那么多看起来很“高深”的东西,现在说一些象我这样的菜鸟都能明白的东西,呵呵,因为这是菜鸟想出来的 菜办法。
4,断线程
我们知道NP是通过CreateRemoteThread在目标进程创建远程线程的,还有一点,很重要的一 点就是:NP向目标进程调用了 CreateRemoteThread后就什么都不管了,也就是说,凭本事可以对除游戏外的所有进程npg gNT.des模块进行任何“处置”。这样我们可以用一个很简单的方法就是检查自己的线程,发现多余的话( 没特别的事情就是NP远程创建的)就马上结束了它,这样NP就无法注入了。但是由于 windows系统是多任务系统,而CreateRemoteThread的执行时间又极短,要在这么短的 时间内发现并结束它的话是一件很困难的事。一旦 CreateRemoteThread执行完毕而我们的监视线程还没有起作用的话,后果就惨重了,npgg NT.des马上把程序“搞死”。因为我们一直试图关闭它的线程,而npggNT.des又拦截了Term inateThread,所以我们就只能不断地“重复重复再重复”去试图关闭 npggNT.des的监视线程。如果我们很幸运地在其执行注入代码时就能断了它地线程地话,npggNT .des就无法注入了。这种方法在NP早期版本大概有百分之五十的成功率,现在能有百分之一的成功率都不错 了。

5,断线程之线程陷阱
我知道“线程陷阱”这个词肯定不是我首创,但用“陷阱”这种方法来对付NP之前在网上是找不到的。为什么要 叫“线程陷阱”?因为这确确实实是一个陷阱,在npggNT.des肯定要经过的地方设置一个“陷阱”,等 它来到之后,掉进去自动就死掉了。而搭建陷阱的方法简单得令你难以相信。
上面我们从npggNT.des的监视原理可以看到,npggNT.des要来挂钩(HOOK)我们的系统 函数,这种的方法我们也会,是不是?哪想想,这种挂钩方法需要用到哪些系统函数呢? 打开进程OpenProcess或GetCurrentProcess(因为npggNT.des已经进入 了目标进程,所以没有必要再调用OpenProcess,肯定是用后者)、找模块地址GetModelHa ndle、找函数地址 GetProcAddress、改写函数头的内存属性VirtualQuery&VirtualProte ct、写内存 WriteProcessMemory。嘿嘿,在这些地方设置陷阱就八九不离十了,肯定是npggNT.d es干那坏勾当要经过的地方。
怎么设陷阱呢?选一个上面说的函数(我没有一一尝试),先自己挂钩(嘿嘿,NP会我们也会)。等到有人调用 的时候,先判断当前的的线程是不是我们程序的,不是的话,那就断了它吧(一个ExitThread就可以了 )。大概就像下面这个样子
HANDLE WINAPI MyGetCurrentProcess(VOID)//替换掉原来的GetCurrentProcess
{
DWORD dwThreadId=GetCurrentThreadId();//得到当前线程ID
if(!IsMyThread(dwThreadId)){//不是我们要保护的线程
ExitThread(0);//断了它吧
}
UnhookGetCurrentProcess(); //是我们要保护的线程调用就恢复函数头
HANDLE hProcess=GetCurrentProcess();//让它调用
RehookGetCurrentProcess();//重新挂钩
return hProcess; //返回调用结果
}
这种方法去掉npggNT.des的监视是完全能够实现的,但是这个函数IsMyThread(dwThr eadId)非常关键,要考虑周全,不然断错线程的话,就“自杀”了。

6,更简单的陷阱
原理跟上面一样,但是我们将替换函数写成这个样子
HANDLE WINAPI MyGetCurrentProcess(VOID)//替换掉原来的GetCurrentProcess
{
HMODLE hMod=GetModelHandle("npggNT.des");
if(hMod!=NULL){
FreeLibrary(hMod); //直接Free掉它
}
UnhookGetCurrentProcess(); //是我们要保护的线程调用就恢复函数头
HANDLE hProcess=GetCurrentProcess();//让它调用
RehookGetCurrentProcess();//重新挂钩
return hProcess; //返回调用结果
}
这种方法就万无一失了,不用担心会“自杀”。

三、总结
由上面可以看到在用户层上反NP监视是不是很简单的事?最简单有效的就是第六种方法,短短的几行代码就可以 搞定了。但是不要指望去掉了 npggNT.des就可以为所欲为了,还有NP还在驱动层做了很多手脚,比如WriteProcessM emory在用户层用没问题,但是过不了NP的驱动检查,对游戏完全没效果。要在NP下读写游戏内存,说起 来又另一篇文章了《如何在NP下读写游戏内存》,请继续关注。

************************************************** ********************
Bypass NP in ring0 (2007年3月16日):
1,Add MyService
2,hook sysenter
3,SystemServiceID->MyServiceID
4,MyService JMP ->SystemService Function + N bytes(参考【原创】SSDT Hook的妙用-对抗ring0 inline hook )

1、2、3 ->绕过NP SSDT检测
4 ->绕过NP 内核函数头检测

NP968下通过

【原创】ring0使nProtect GameGuard的键盘保护失效

【原创】ring0使nProtect GameGuard的键盘保护失效
http://bbs.pediy.com/showthread.php?t=42120

Quote:
标 题: 【原创】ring0使nProtect GameGuard的键盘保护失效
作 者: 堕落天才
时 间: 2007-04-04,12:36
链 接: http://bbs.pediy.com/showthread.php?t=42120

KeyEnable 能够使NP的ring0键盘保护失效,从而使keybd_event ,mouse_event函数的使用在ring0不受影响.
本程序在XP SP2 测试通过,千万不要在非XP系统使用.
理论上本程序能对付目前所有版本的NP

注意:本程序被某些杀毒软件报木马,请想清楚再下载!

【原创】SSDT Hook的妙用-对抗ring0 inline hook

【原创】SSDT Hook的妙用-对抗ring0 inline hook


标 题: 【原创】SSDT Hook的妙用-对抗ring0 inline hook
作 者: 堕落天才
时 间: 2007-03-10,15:18
链 接: ã€�原创】SSDT Hook的妙用ï¼�对抗ring0 inline hook - 看雪软件安全论å�›

************************************************** *****
*标题:【原创】SSDT Hook的妙用-对抗ring0 inline hook *
*作者:堕落天才 *
*日期:2007年3月10号 *
*声明:本文章的目的仅为技术交流讨论 *
************************************************** *****

1,SSDT
SSDT即系统服务描述符表,它的结构如下(参考《Undocument
Windows 2000 Secretes》第二章):
typedef struct _SYSTEM_SERVICE_TABLE
{
PVOID ServiceTableBase; //这个指向系统服务函数地址表
PULONG ServiceCounterTableBase;
ULONG NumberOfService; //服务函数的个数,NumberOfService*4 就是整个地址表的大小
ULONG ParamTableBase;
}SYSTEM_SERVICE_TABLE,*PSYSTEM_SERVICE_TABLE;

typedef struct _SERVICE_DESCRIPTOR_TABLE
{
SYSTEM_SERVICE_TABLE ntoskrnel; //ntoskrnl.exe的服务函数
SYSTEM_SERVICE_TABLE win32k; //win32k.sys的服务函数,(gdi.dll/user.dll的内核支持)
SYSTEM_SERVICE_TABLE NotUsed1;
SYSTEM_SERVICE_TABLE NotUsed2;
}SYSTEM_DESCRIPTOR_TABLE,*PSYSTEM_DESCRIPTOR_TABLE ;

内核中有两个系统服务描述符表,一个是KeServiceDescriptorTable(由ntoskr nl.exe导出),一个是 KeServieDescriptorTableShadow(没有导出)。两者的区别是,KeServi ceDescriptorTable仅有 ntoskrnel一项,KeServieDescriptorTableShadow包含了ntoskr nel以及win32k。一般的 Native API的服务地址由KeServiceDescriptorTable分派,gdi.dll/user.dll的内核API调用服务地址由 KeServieDescriptorTableShadow分派。还有要清楚一点的是win32k.sy s只有在GUI线程中才加载,一般情况下是不加载的,所以要Hook KeServieDescriptorTableShadow的话,一般是用一个GUI程序通过IoCon trolCode来触发 (想当初不明白这点,蓝屏死机了N次都想不明白是怎么回事)。

2,SSDT HOOK
SSDT HOOK 的原理其实非常简单,我们先实际看看KeServiceDescriptorTable是什么 样的。
lkd> dd KeServiceDescriptorTable
8055ab80 804e3d20 00000000 0000011c 804d9f48
8055ab90 00000000 00000000 00000000 00000000
8055aba0 00000000 00000000 00000000 00000000
8055abb0 00000000 00000000 00000000 00000000
在windbg.exe中我们就看得比较清楚,KeServiceDescriptorTable中就只有 第一项有数据,其他都是0。其中804e3d20就是
KeServiceDescriptorTable.ntoskrnel.ServiceTableBas e,服务函数个数为0x11c个。我们再看看804e3d20地址里是什么东西:
lkd> dd 804e3d20
804e3d20 80587691 805716ef 8057ab71 80581b5c
804e3d30 80599ff7 80637b80 80639d05 80639d4e
804e3d40 8057741c 8064855b 80637347 80599539
804e3d50 8062f4ec 8057a98c 8059155e 8062661f
如上,80587691 805716ef 8057ab71 80581b5c 这些就是系统服务函数的地址了。比如当我们在ring3调用 OpenProcess时,进入sysenter的ID是0x7A(XP SP2),然后系统查KeServiceDescriptorTable,大概是这样KeServiceD escriptorTable.ntoskrnel.ServiceTableBase(804e3d20 ) + 0x7A * 4 = 804E3F08,然后804E3F08 ->8057559e 这个就是OpenProcess系统服务函数所在,我们再跟踪看看:
lkd> u 8057559e
nt!NtOpenProcess:
8057559e 68c4000000 push 0C4h
805755a3 6860b54e80 push offset nt!ObReferenceObjectByPointer+0x127 (804eb560)
805755a8 e8e5e4f6ff call nt!InterlockedPushEntrySList+0x79 (804e3a92)
805755ad 33f6 xor esi,esi
原来8057559e就是NtOpenProcess函数所在的起始地址。
嗯,如果我们把8057559e改为指向我们函数的地址呢?比如 MyNtOpenProcess,那么系统就会直接调用MyNtOpenProcess,而不是原来的Nt OpenProcess了。这就是SSDT HOOK 原理所在。

3, ring0 inline hook
ring0 inline hook 跟ring3的没什么区别了,如果硬说有的话,那么就是ring3发生什么差错的话程序会挂掉 , ring0发生什么差错的话系统就挂掉,所以一定要很小心。inline hook的基本思想就是在目标函数中JMP到自己的监视函数,做一些判断然后再 JMP回去。一般都是修改函数头,不过再其他地方JMP也是可以的。下面我们来点实际的吧:
lkd> u nt!NtOpenProcess
nt!NtOpenProcess:
8057559e e95d6f4271 jmp f199c500
805755a3 e93f953978 jmp f890eae7
805755a8 e8e5e4f6ff call nt!InterlockedPushEntrySList+0x79 (804e3a92)
...
同时打开“冰刃”跟“Rootkit Unhooker”我们就能在NtOpenProcess函数头看到这样的“奇观”,第一个jmp是“冰刃 ”的,第二个jmp是“Rootkit Unhooker”的。他们这样是防止被恶意程序通过TerminateProcess关闭。当然“冰刃” 还 Hook了NtTerminateProcess等函数。

×××××××××××××××××××××××××××××××××××××××××××××××××× ×××××××××××××
好了,道理就说完了,下面就进入本文正题。
对付ring0 inline hook的基本思路是这样的,自己写一个替换的内核函数,以NtOpenProcess为例,就是 MyNtOpenProcess。然后修改SSDT表,让系统服务进入自己的函数MyNtOpenProc ess。而MyNtOpenProcess要做的事就是,实现NtOpenProcess前10字节指令, 然后再JMP到原来的NtOpenProcess的十字节后。这样NtOpenProcess 函数头写的JMP都失效了,在ring3直接调用OpenProcess再也毫无影响。
************************************************** ************************************************** ***********************
#include

typedef struct _SERVICE_DESCRIPTOR_TABLE
{
PVOID ServiceTableBase;
PULONG ServiceCounterTableBase;
ULONG NumberOfService;
ULONG ParamTableBase;
}SERVICE_DESCRIPTOR_TABLE,*PSERVICE_DESCRIPTOR_TAB LE; //由于KeServiceDescriptorTable只有一项,这里就简单点了
extern PSERVICE_DESCRIPTOR_TABLE KeServiceDescriptorTable;//KeServiceDescriptorTable为导出函数

/////////////////////////////////////
VOID Hook();
VOID Unhook();
VOID OnUnload(IN PDRIVER_OBJECT DriverObject);
//////////////////////////////////////
ULONG JmpAddress;//跳转到NtOpenProcess里的地址
ULONG OldServiceAddress;//原来NtOpenProcess的服务地址
//////////////////////////////////////
__declspec(naked) NTSTATUS __stdcall MyNtOpenProcess(PHANDLE ProcessHandle,
ACCESS_MASK DesiredAccess,
POBJECT_ATTRIBUTES ObjectAttributes,
PCLIENT_ID ClientId)
{
DbgPrint("NtOpenProcess() called");
__asm{
push 0C4h
push 804eb560h //共十个字节
jmp [JmpAddress]
}
}
///////////////////////////////////////////////////
NTSTATUS DriverEntry(IN PDRIVER_OBJECT DriverObject,PUNICODE_STRING RegistryPath)
{
DriverObject->DriverUnload = OnUnload;
DbgPrint("Unhooker load");
Hook();
return STATUS_SUCCESS;
}
/////////////////////////////////////////////////////
VOID OnUnload(IN PDRIVER_OBJECT DriverObject)
{
DbgPrint("Unhooker unload!");
Unhook();
}
/////////////////////////////////////////////////////
VOID Hook()
{
ULONG Address;
Address = (ULONG)KeServiceDescriptorTable->ServiceTableBase + 0x7A * 4;//0x7A为NtOpenProcess服务ID
DbgPrint("Address:0x%08X",Address);

OldServiceAddress = *(ULONG*)Address;//保存原来NtOpenProcess的地址
DbgPrint("OldServiceAddress:0x%08X",OldServiceAddr ess);

DbgPrint("MyNtOpenProcess:0x%08X",MyNtOpenProcess) ;

JmpAddress = (ULONG)NtOpenProcess + 10; //跳转到NtOpenProcess函数头+10的地方,这样在其前面写的JMP都失效了
DbgPrint("JmpAddress:0x%08X",JmpAddress);

__asm{//去掉内存保护
cli
mov eax,cr0
and eax,not 10000h
mov cr0,eax
}

*((ULONG*)Address) = (ULONG)MyNtOpenProcess;//HOOK SSDT

__asm{//恢复内存保护
mov eax,cr0
or eax,10000h
mov cr0,eax
sti
}
}
//////////////////////////////////////////////////////
VOID Unhook()
{
ULONG Address;
Address = (ULONG)KeServiceDescriptorTable->ServiceTableBase + 0x7A * 4;//查找SSDT

__asm{
cli
mov eax,cr0
and eax,not 10000h
mov cr0,eax
}

*((ULONG*)Address) = (ULONG)OldServiceAddress;//还原SSDT

__asm{
mov eax,cr0
or eax,10000h
mov cr0,eax
sti
}

DbgPrint("Unhook");
}
×××××××××××××××××××××××××××××××××××××××××××××××××× ××××××××
就这么多了,或许有人说,没必要那么复杂,直接恢复NtOpenProcess不就行了吗?对于象“冰刃” “Rookit Unhooker”这些“善良”之辈的话是没问题的,但是象NP这些“穷凶极恶”之流的话,它会不断检测N tOpenProcess是不是已经被写回去,是的话,嘿嘿,机器马上重启。这也是这种方法的一点点妙用。